Guide
How to Count Fixtures from a Lighting Plan
Read the fixture tags and the luminaire schedule, count every type and variant, and catch the fixtures that hide on other sheets.
By IntelCost Team · · 8 min read
A lighting fixture count looks like the easy part of an electrical takeoff: find the symbols, count them, move on. It is also easy to get wrong. A standard fixture gets lumped in with its emergency version, an enlarged plan gets counted twice, or a row of wall packs drawn on an elevation never makes it into the count. This guide covers the plan, the schedule, counting by type and variant, the items each fixture drives, and the checks to run before you price.
What a lighting plan shows
Two kinds of sheets show light fixtures, and you need both.
- The reflected ceiling plan (RCP) is the architect's sheet. It shows the ceiling as if reflected in a mirror on the floor: the grid, ceiling heights and materials, and where each fixture sits.
- The electrical lighting plan shows the same fixtures with the information you count from: a type tag on each fixture, the circuits, and the switching.
Count from the electrical lighting plan and use the RCP to check locations and ceiling types. A fixture that lands in a drywall ceiling on the RCP needs different support and labor than the same fixture in a lay-in grid.
On the lighting plan, each fixture usually carries some of these:
- A type tag, such as A, B2 or F1, that points to a row in the luminaire schedule.
- A circuit number, such as LP-1-12 (panel LP-1, circuit 12), often shown only at the home run.
- A switch leg letter, a lowercase a or b, that ties the fixture to a switch.
- An emergency mark, often a shaded symbol or an EM suffix on the tag.
Conventions vary from one engineer to the next, so read the symbol legend on the first electrical sheet before you count anything.
Read the luminaire schedule first
The luminaire schedule (also called the light fixture schedule) is the key to the tags. A typical one has these columns:
| Column | What it tells you |
|---|---|
| Type | The tag used on the plan: A, A1, B, X1 |
| Description | 2x4 LED troffer, 6 in downlight, linear pendant, wall pack |
| Manufacturer and catalog number | What to price, and often listed alternates |
| Source | LED lumens, color temperature, driver type (for example 0-10V dimming) |
| Voltage | 120V, 277V or universal |
| Mounting | Recessed grid, recessed hard ceiling, surface, pendant, wall |
| Remarks | Emergency battery, sensors, special finishes, "provide where shown" notes |
The mounting and remarks columns matter as much as the description. Mounting drives support, boxes and labor. Remarks are where an emergency battery, an integral sensor or a pendant length hides.
Before you open the plan, list your count items from the schedule: one item per type, plus any variant the remarks create. Starting from the schedule means a type with zero count stands out at the end instead of quietly disappearing.
Type variants: A, A1 and A-EM
Designers often derive several fixture types from one base fixture. On the plan they can look identical, and only the tag or the shading tells them apart.
| Tag (example) | What it often means | Why it is its own item |
|---|---|---|
| A | 2x4 LED troffer, standard | The base price |
| A1 | Same troffer, different lumen output or lens | Different catalog number, often a different price |
| A-EM (or AE, or a shaded A) | Same troffer with an integral emergency battery pack | The battery adds material, and the fixture needs an unswitched feed |
| A/NL | Night light version | Wired unswitched, so it affects the circuit and switching |
Count each variant as its own item. If the schedule has no separate row for a variant but the remarks say something like "provide type A with emergency battery where shown EM", still give the EM version its own count.
Count by type, then by area or circuit
A routine that works on paper or in software:
- Gather every sheet that shows fixtures. Lighting plans first, then the sheets listed under common misses below.
- Set up the count items from the schedule. One per type and variant.
- Count one type at a time, one sheet at a time. Mark each fixture as you count it, with a highlighter on paper or a count mark on screen, so you can see what is left.
- Split by area where the bid needs it. Floors, buildings, phases and alternates usually need their own counts. So does work where labor changes, such as high bay fixtures at 30 ft against office fixtures at 9 ft.
- Total each type and check it against the schedule.
When to count by circuit
Counting by circuit is not usually needed to price fixtures, but it is a useful check and it helps with branch wiring and home runs. Panel schedules list a load on each circuit, and you can compare that with your count.
Example check, with example values:
- Panel schedule shows circuit LP-1-5 at 480 VA.
- Type A is 40 W per fixture.
- 480 VA / 40 W = about 12 fixtures expected on that circuit.
If your count on that circuit is 9, look again. The circuit may carry other loads, or the panel schedule may be rounded, so treat this as a pointer to recheck, not a source of quantities.
Exit signs and emergency lighting
Exit signs and emergency units often sit outside the luminaire schedule, in the symbol legend or on a separate emergency lighting or life safety plan. Count them as their own items:
- Exit signs: single face or double face, with or without directional arrows, ceiling, wall or end mount, battery backed or fed from an emergency circuit. Each combination is a separate line.
- Emergency battery units: the wall-mounted twin-head units, plus any remote heads they feed.
- Exterior emergency lights at exit doors, often shown on elevations or the site plan.
- Fixtures with an integral battery: the A-EM style variants above.
- Fixtures on an emergency circuit: the fixture itself is standard, but it may need a transfer or bypass device so it comes on when normal power fails. Check the remarks, the emergency riser and the details; these devices often have no symbol of their own.
What follows from the count
Each fixture drives other material and labor. What applies depends on your specs, the ceiling type and local code.
| Item | Usually driven by |
|---|---|
| Fixture whips (flexible connections) | One per lay-in fixture, at the length the spec allows |
| Support wires or clips | Each fixture in a suspended ceiling, as the specs and local code require |
| Outlet or junction boxes | Surface, pendant and wall fixtures that do not carry their own box |
| Pendant stems or cable | Each pendant, length from the ceiling height less the mounting height |
| Plaster frames or mounting rings | Recessed fixtures in drywall ceilings |
| Lamps | Only fixtures that are not integral LED |
| Labor | Each fixture, by type, mounting and working height |
Worked example, with example values. Say a floor has 48 type A troffers in a lay-in grid, the spec calls for a 6 ft whip at each fixture, and support wires at two corners of each fixture (check what your spec and local code require):
- Whips: 48 fixtures x 1 whip = 48 whips
- Whip length: 48 whips x 6 ft = 288 ft, if you buy the whips as cable and fittings
- Support wires: 48 fixtures x 2 wires = 96 support wires
Lighting controls follow the layout too: switches, dimmers, occupancy and daylight sensors, and relay or control panels. They have their own symbols, so count them as separate items rather than assuming them from the fixture count. When the counts go into the estimate under Division 26, the CSI division for electrical, each item gets its own unit price for material and labor.
Check the count against the schedule
Before the count goes into the price, reconcile it.
- Every type in the schedule has a count. A type with zero is on a sheet you have not opened, in an alternate, or not used at all. If you cannot tell which, ask in an RFI.
- Every tag on the plan is in the schedule. A tag with no row is a question for the engineer, not a guess.
- Spot check a few rooms against the RCP, the architect's sheet.
- Use the panel schedule check above on a few circuits.
- Read the addenda. Fixture types get added, deleted and substituted after the bid set goes out.
Common misses
Fixtures on other sheets. Lighting is not only on the lighting plans. Look for:
- Site lighting, poles and bollards on the electrical site plan
- Wall packs and building-mounted lights on exterior elevations
- Under-cabinet and display lighting on interior elevations or casework drawings
- Cove and slot lighting in architectural ceiling details
- Exit signs and emergency units on a separate life safety plan
Enlarged plans. Restrooms, kitchens, labs and stairs are often redrawn at a larger scale. The overall plan may show the same fixtures again or may say "see enlarged plan". Count each area from one sheet only, and mark it on the other sheet as counted elsewhere.
"Typical" notes. A TYP. beside one tagged fixture usually means every identical symbol in that room or area is the same type, even though only one carries a tag. A note such as "typical of 6 units" or a typical floor plan means multiply. Read the note's scope carefully: typical for this room is not the same as typical for every room like it.
Existing, relocated and owner-furnished fixtures. Fixtures marked existing to remain, relocate, or owner furnished and contractor installed need labor, or nothing, but no new fixture.
Alternates. An alternate may upgrade one fixture type in one area. Keep it in its own count so the base bid stays clean.
Counting with Auto Count
Software can do the finding while you do the checking. In IntelCost, Auto Count starts from one fixture you box on the sheet and searches the current page, every page, or the sheets you choose, including turned and mirrored copies. On vector PDFs, when look-alike fixtures carry different printed tags, it makes one item per tag, and where a tag is printed once and marked TYP., the untagged copies are counted with it. Every match shows as a card for you to check, and nothing is counted until you press Create.
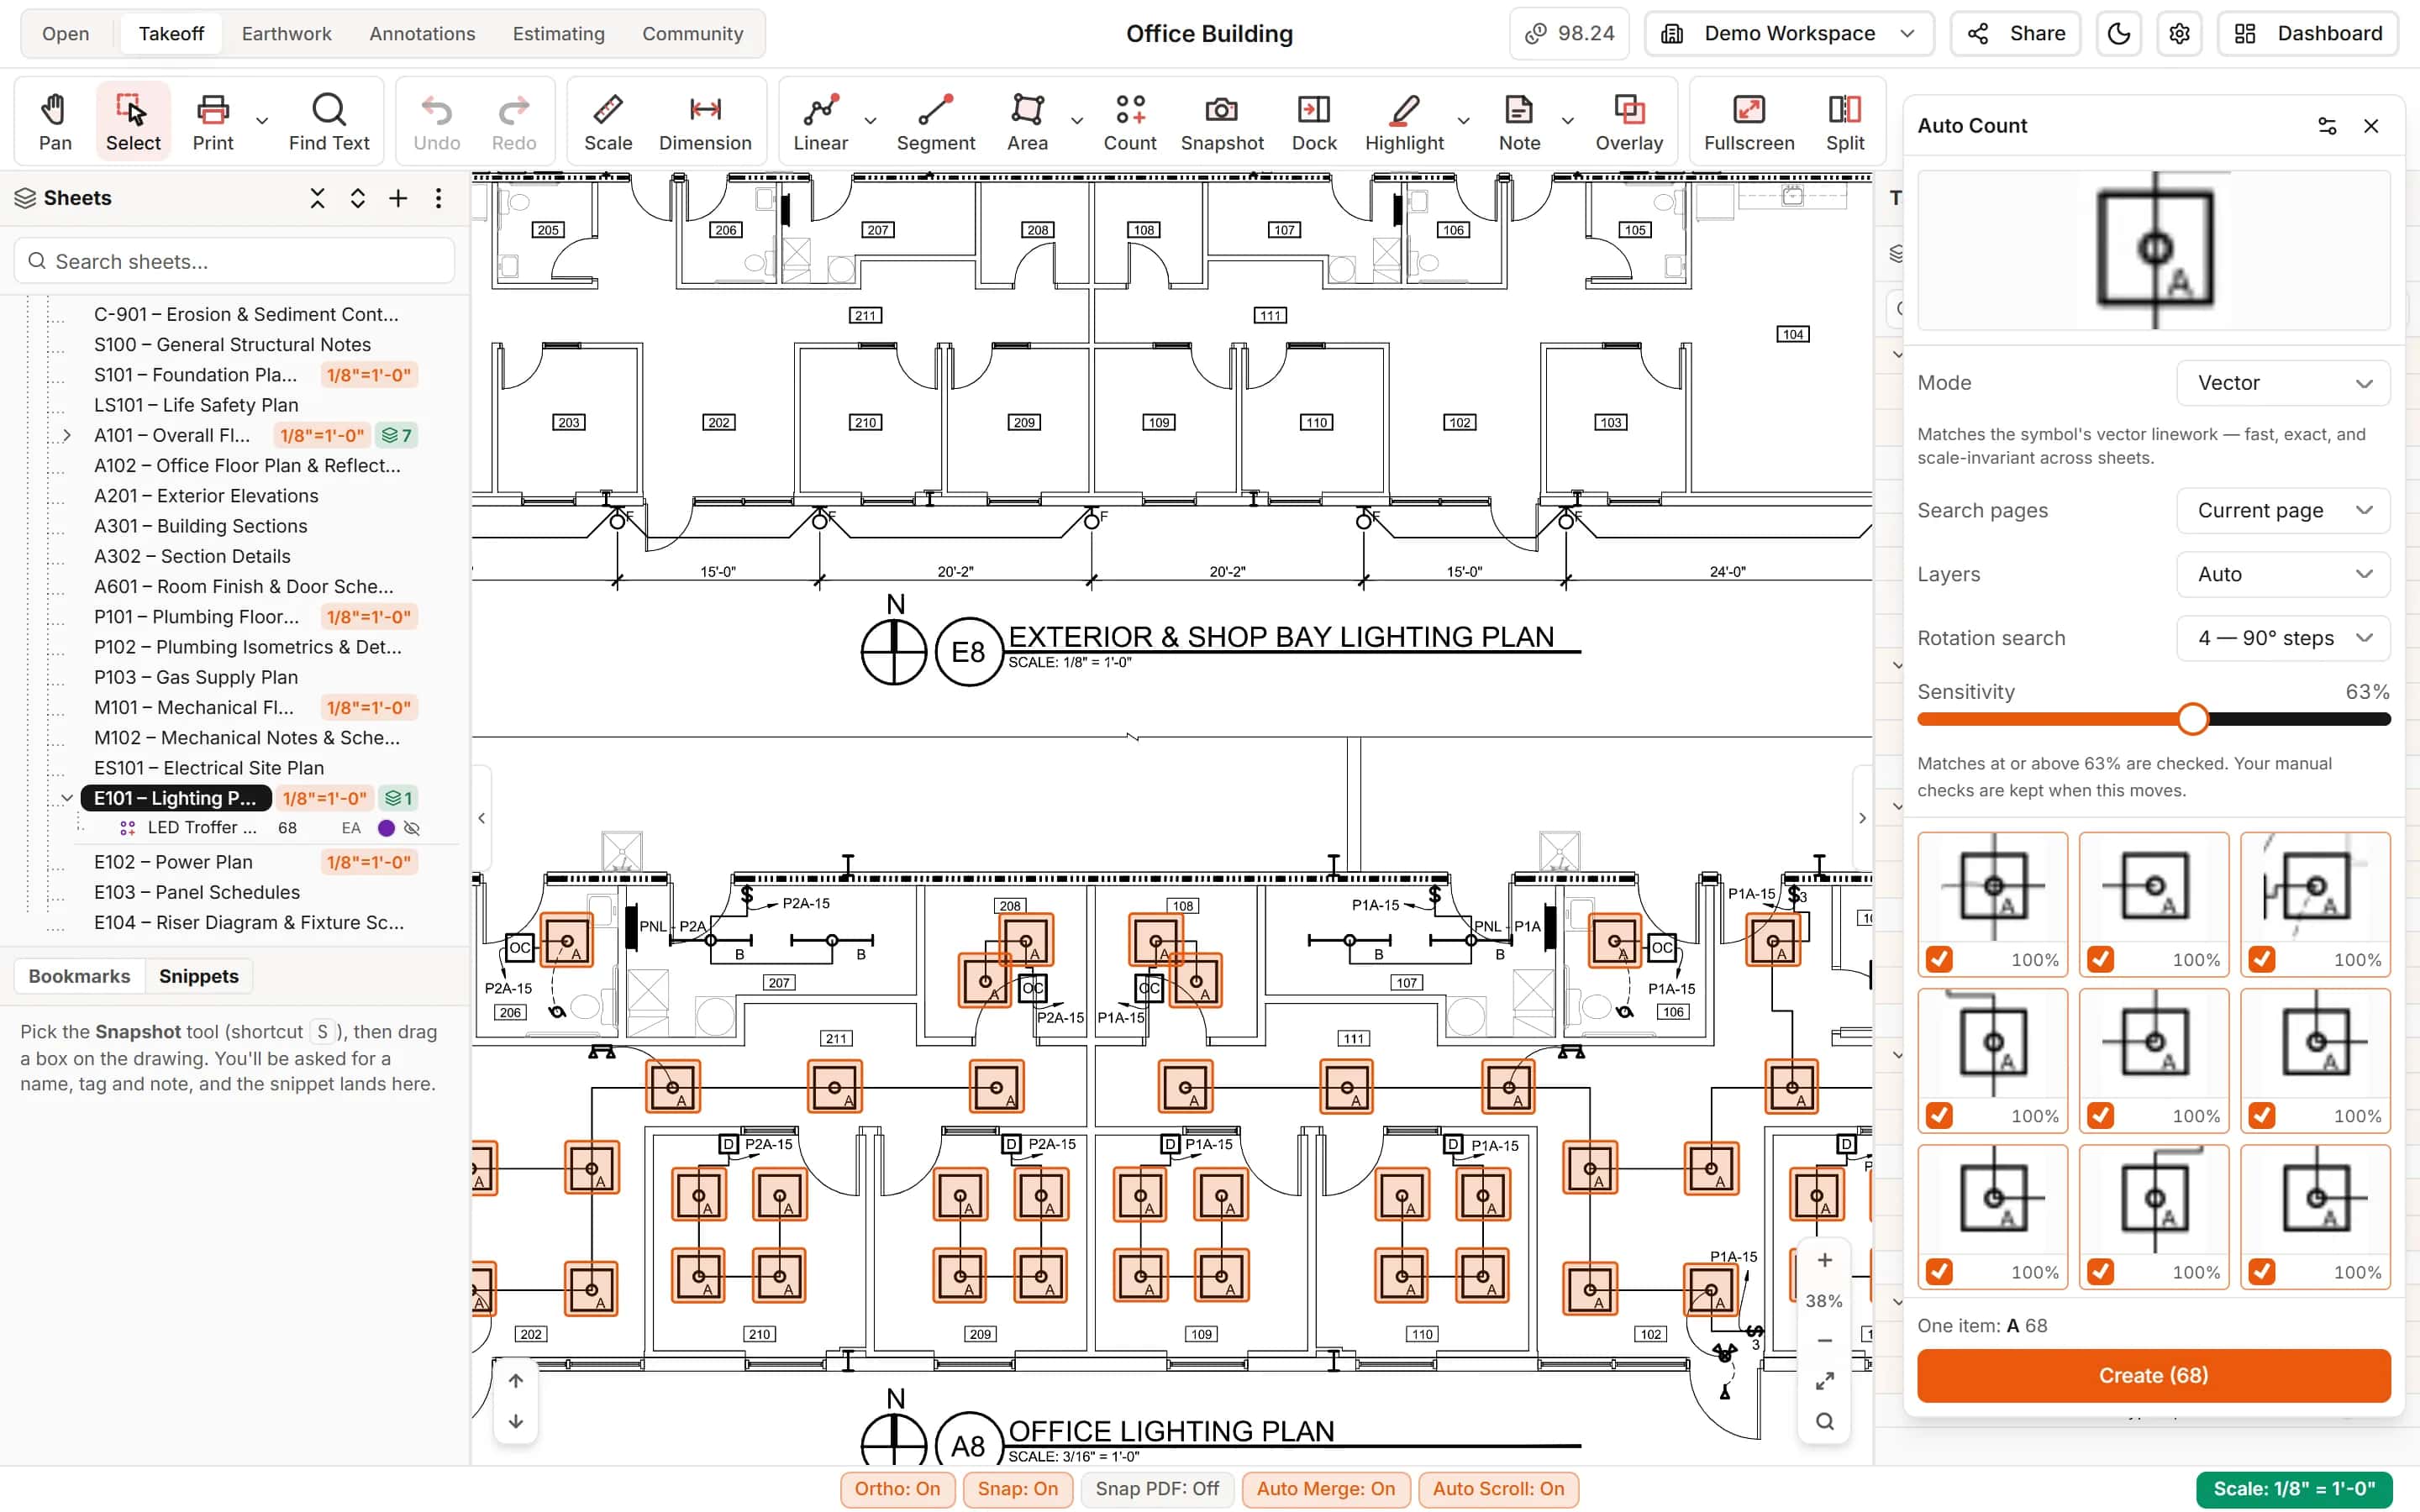
Choose the sheets on purpose. If an enlarged plan repeats part of the overall plan, leave one of them out of the search, for the same reason you would not count it twice by hand. The door and hardware schedule takeoff guide applies the same plan and schedule cross-check to openings. Electrical contractors can find more on the electrical contractors page.
Checklist
- Symbol legend and luminaire schedule read before counting
- One count item per type and variant, EM and night light included
- Exit signs, emergency units and transfer devices counted separately
- Site, elevation, casework and detail sheets checked; enlarged plans counted once
- Every schedule type has a count, every plan tag has a schedule row
- Addenda applied
A quantity takeoff for lighting is only as good as the sheets you looked at. Count from the schedule out, mark as you go, and reconcile before you price.